
Create an Export Permit Letter Application
April 2025
Table of Contents
- Create an Export Permit Letter
- Navigation
- Section 1 Requestor Information
- Section 2 Manufacturer Information
- Section 3 Product Information
- Section 4 List country(ies) for which the Export Permit List is requested
- Section 5 Attachments
- Final Review Screen
Create an Export Permit Letter
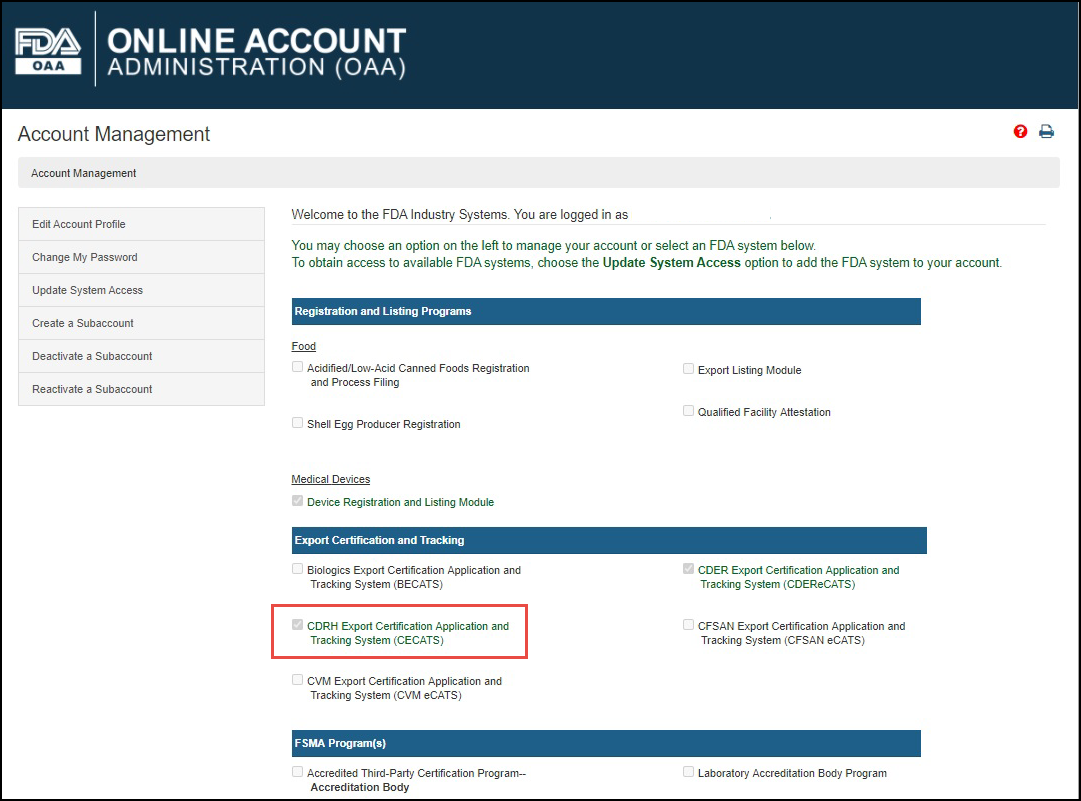
Log into the FDA Industry Systems (FIS) https://www.access.fda.gov and select "CDRH Export Certification Application & Tracking System" from the list of systems available on the FURLS "Home" Page, as shown in Figure 1.
Figure
1: FDA Industry Systems Page
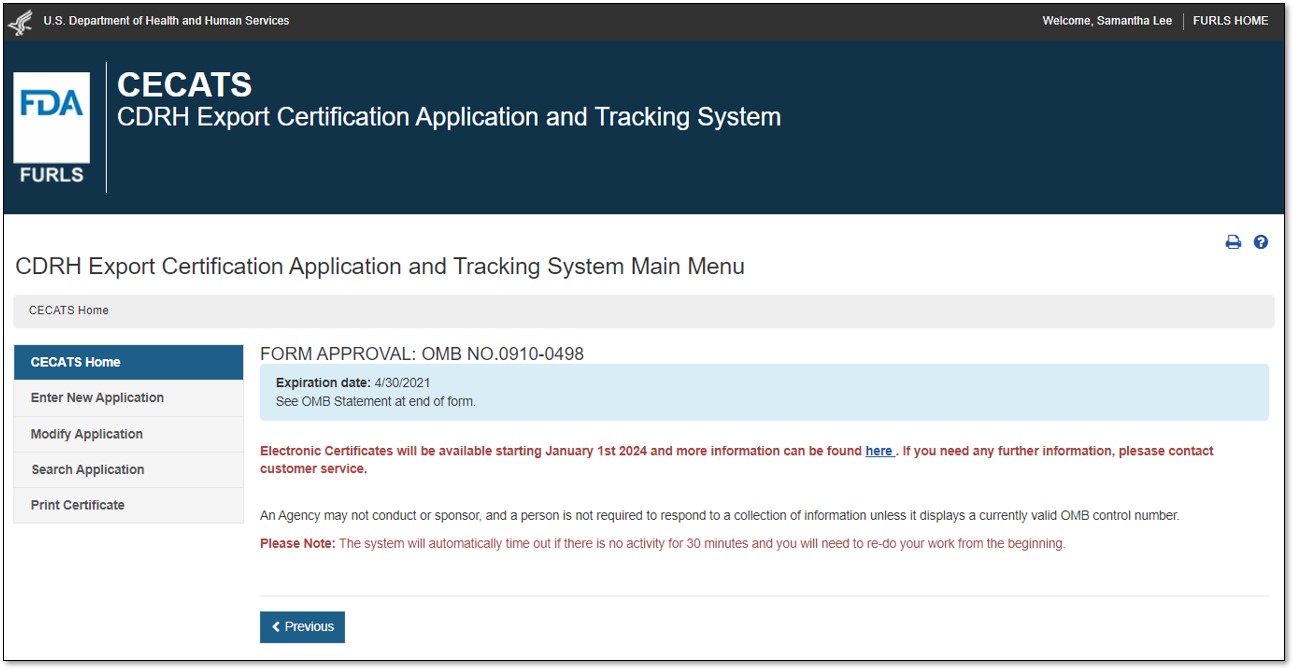
Select "Yes" in response to the question "Will the devices be exported from the United States?". Select "Continue" and the system will open the CECATS "Home" page. The CECATS Main Menu page is shown in Figure 2 below.
Figure
2: CECATS Main Menu
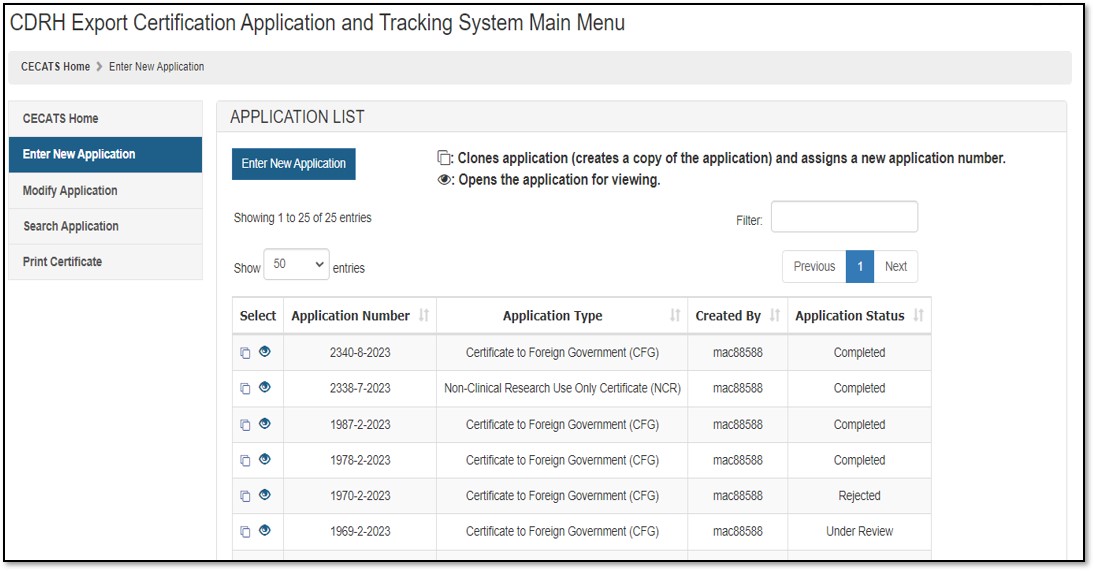
To create a new application, click "Enter New Application". All applications that you have saved or submitted will be displayed, as shown in Figure 3 below. Applications which are saved, but not submitted, will be in "Draft" status until you submit them.
- To create a new application, click "Enter New Application" from the "Main Menu" page and then click the "Enter New Application" button.
- To continue working on a draft application, click on Pencil ("Edit") icon
 associated to the desired application.
 - To clone a previous application, click on the double book ("Clone") icon
 next to the application number.
 - Verify the information on each page is still correct and continue through all screens.
You may select "Modify Application" (when applicable) or "Search Application" for an existing application from the Main Menu.
NOTE: "Return for Action" status indicates that upon review of the application by the FDA, additional information or clarification was required. CECATS will send an email to the requestor, with comments from the reviewer. They will provide a 48-hour window for modifications. If modifications cannot be made within 48 hours, the status will automatically change to "Incomplete". Please clone, modify, and submit the application when ready. A new application number will be assigned.
Figure
3: Submitted and Draft Application View
The Center for Devices and Radiological Health (CDRH) issues several types of Export documents. When creating a new application, select which application type to be requested as shown in Figure 4.
Figure
4: Application Type
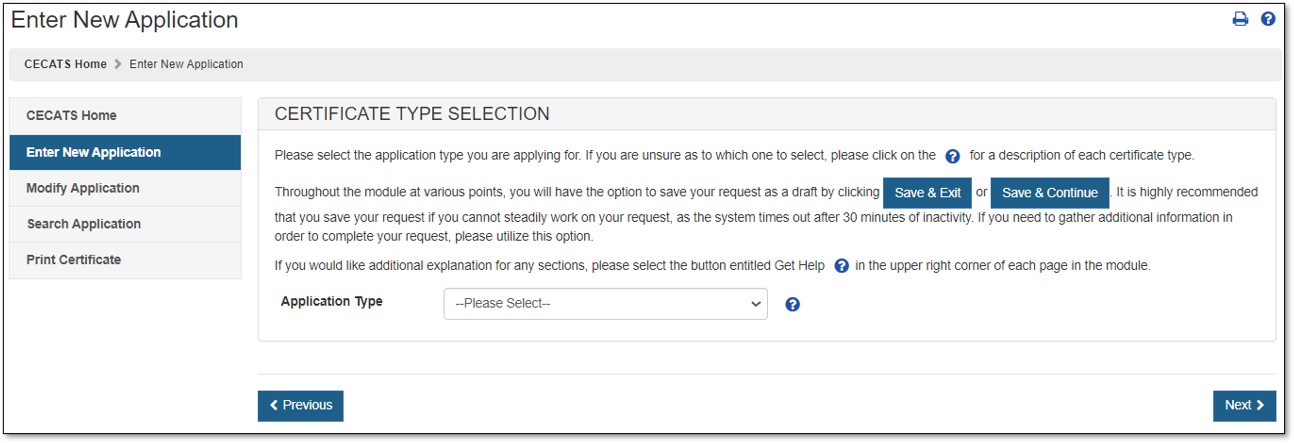
Select "Export Permit Letter".
Export Permit Letter
Description of an Export Permit Letter
For a description of each application type, select the question mark icon located next to the Application Type dropdown list, as shown in Figure 4 above.
To obtain an Export Permit Letter, which affirms FDA's approval to export devices in accordance with section 801(e)(2) of the FD&C Act, a request should include the following information:
- A complete description of the device intended for export
- The status of the device in the U.S. (e.g., whether it is investigational, banned, etc.)
- A statement indicating the requestor conducted a search of the Medical Literature Analysis and Retrieval System database; (see instructions below). There will be a summary of the search results, as well as a summary of safety data to demonstrate that export of the device will not endanger the public health and safety, or documentation of exemption from this requirement (see below).
- A letter from the appropriate foreign liaison (i.e., the person with authority to sign a letter of acceptance for the foreign government) - identified in the CDRH Foreign Liaison Listing. This must be written in English or accompanied by a certified, English translation stating that:
- The device is not in conflict with the laws of the country to which it is intended for export
- The foreign Government has full knowledge of the status of the device in the U.S.
- The import is permitted/not objected to
Navigation
A status bar at the top of every page will track your progress through each step of the application process, as shown in Figure 5 below.
Figure 5:
Navigation Bar

A "Get Help" icon (located at the top right of each page) will provide page-specific help. For an overview of all help files available, please refer to the FIS Index of Help Pages at https://www.access.fda.gov/cecats/help/cecats-epl-guide.html.
Also located the top right corner of each page is a "FURLS HOME" link, which will navigate you to the FURLS "Home" page. The "CECATS HOME" link will take you to the CECATS "Home" page; (Refer to Figure 2). To log out of the system, select "FURLS HOME" and click on "Logout".
At the top and bottom of each screen are navigation buttons as shown in Figure 6 below.
Figure 6:
Navigation Buttons
![]()
- Previous – Navigates back one screen or back one step. Information entered on the current screen will NOT be saved if you select the "Previous" button.
- Save & Exit – Information entered up to this point will be saved. Your application will be set to a "Draft" status until you complete and submit the application. If you do not perform any activity for 30 days, the system will automatically cancel and delete the application. When you log into the CECATS system, all applications in a "Draft" status will be displayed after selecting the "Enter New Application" option from the main menu.
- Next – All information is saved on the current screen and navigates to the beginning of the next step. However, exiting CECATS without using the "Save & Exit" button will cause the loss of the entire request.
NOTE: All Fields except marked as "Optional" in parenthesis are mandatory fields. You will NOT be able to proceed to the next step or "Save & Exit" until all mandatory fields have been properly entered on the current screen.
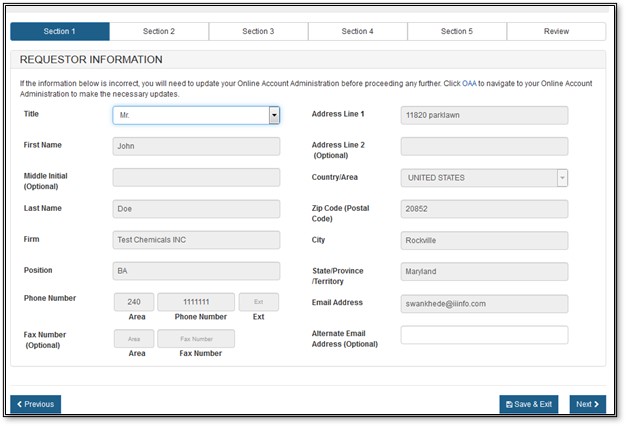
Section 1 - Requestor Information
The requestor is the owner of the account from which the application is filed and the person requesting the Export Permit Letter. The requestor is responsible for completing and signing the application form.
Most of the fields in section one is automatically populated based on the information from your Online Account Administration (OAA) and cannot be edited in CECATS. If the information is incorrect, you can click on the "FURLS Home" link, located in the top right corner. Then select "Edit Account Profile" on the left-hand side and update your account profile accordingly.
Once you have updated your account, log back into CECATS and verify your changes.
NOTE: The Title field is required in section 1.
Once you have completed these fields, click on "Next". See Figure 7 below.
Figure
7: Section 1 - Requestor Information
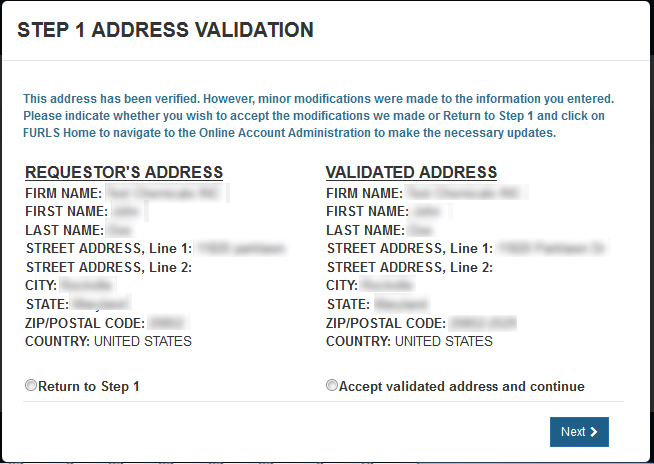
Address Validation
The requestor's address will be displayed and validated. If the address is incorrect, you will need to exit the application and make the necessary updates to your Online Account Administration. Otherwise, select the "Accept validated address and continue" radio button and click on "Next" to proceed to Step 2. See Figure 8 below.
Figure
8: Address Validation
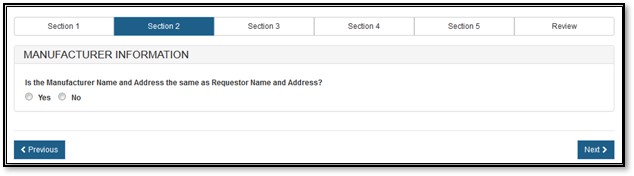
Section 2 - Manufacturer Information
The manufacturing company is the company that manufactures one or more of the products. This company can be the same as the requestor. The system prompts whether your manufacturing name and address are the same as the requestor name and address, as shown in Figure 9 below.
Figure
9: Manufacturing Name and Address same as Requestor Name and Address
If you select "No", you must fill out the manufacturing information fields, as shown in Figure 10 below.
Figure
10: Manufacturing Information
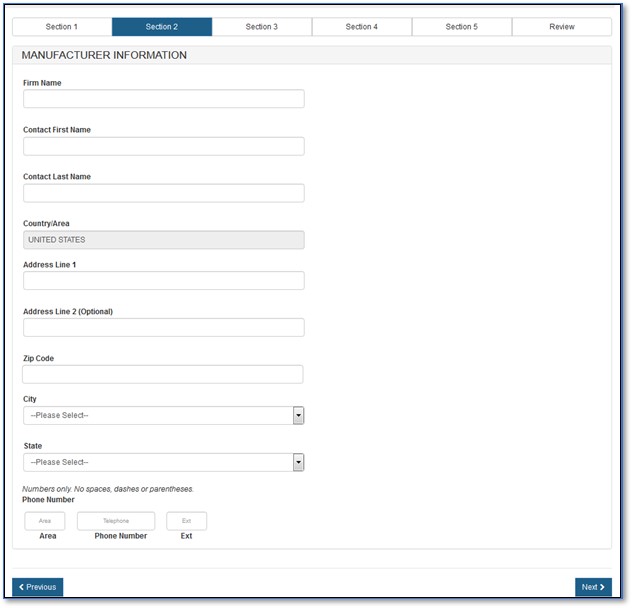
NOTE: For an Export Permit Letter, you can add only one manufacturer per application.
Once you have entered all required fields, click on the "Next" button to proceed.
Section 3 - Product Information
In section 3, you are able to add your product information. Enter the "Name of the Device" and indicate if there are any accessories included, as shown in Figure 11 below.
Optional: You may enter the "IDE Number" for your product.
Figure
11: Product Information
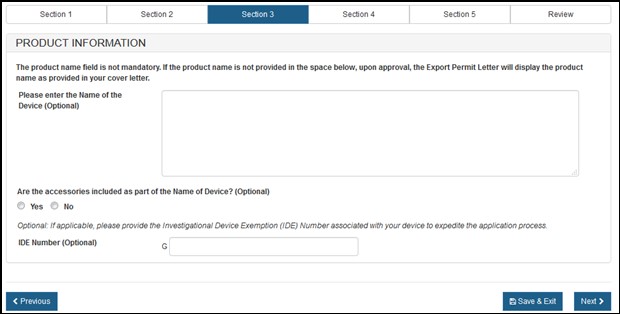
Once you have entered all required fields, click on the "Next" button to proceed.
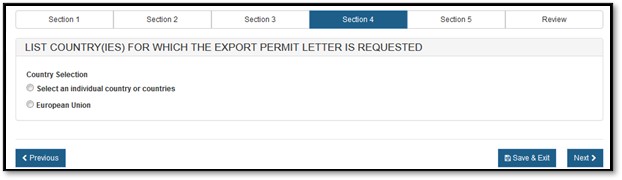
Section 4 – List Country(ies) for which the Certificates are Requested
Please select one of the radio buttons, as shown in Figure 12 below.
Figure
12: Country Selection
If you selected "Select an individual country or countries" the system displays a table of all countries, as shown in Figure 13 below.
NOTE: Another method to select a country (other than scrolling down the list) is to first click on a country from the country list and then type in the first few letters of the desired country name. The system will jump to the country that begins with the letters typed. You also have the option to hold down the "CTRL" button and select multiple countries.
Figure
13: List of Countries
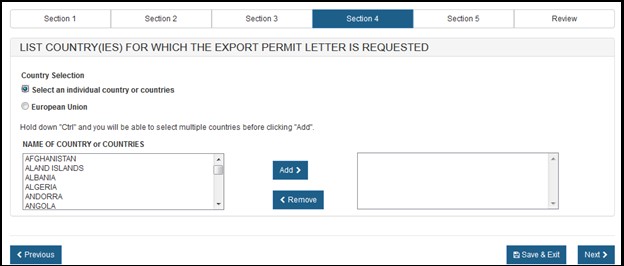
Once you have selected the country or countries, click "Next" to proceed.
Foreign Liaison Information
For an Export Permit Letter, you must provide "Foreign Liaison" information, as shown in Figure 14 below.
Figure
14: Foreign Liaison Information per Country
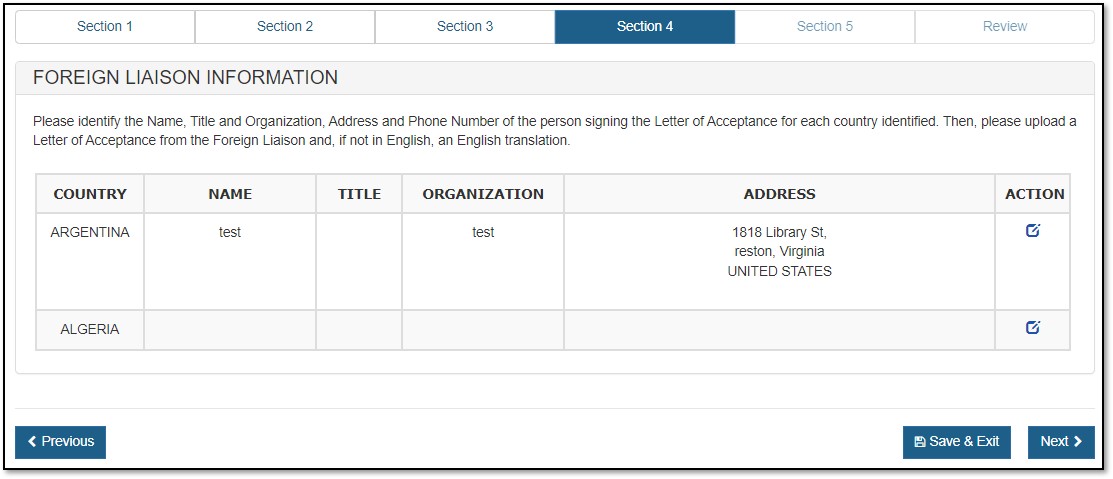
Click on the ![]() (Edit) icon from the Action column corresponding to each country. See Figure 15 below.
(Edit) icon from the Action column corresponding to each country. See Figure 15 below.
Figure 15: Update Foreign Liaison Information
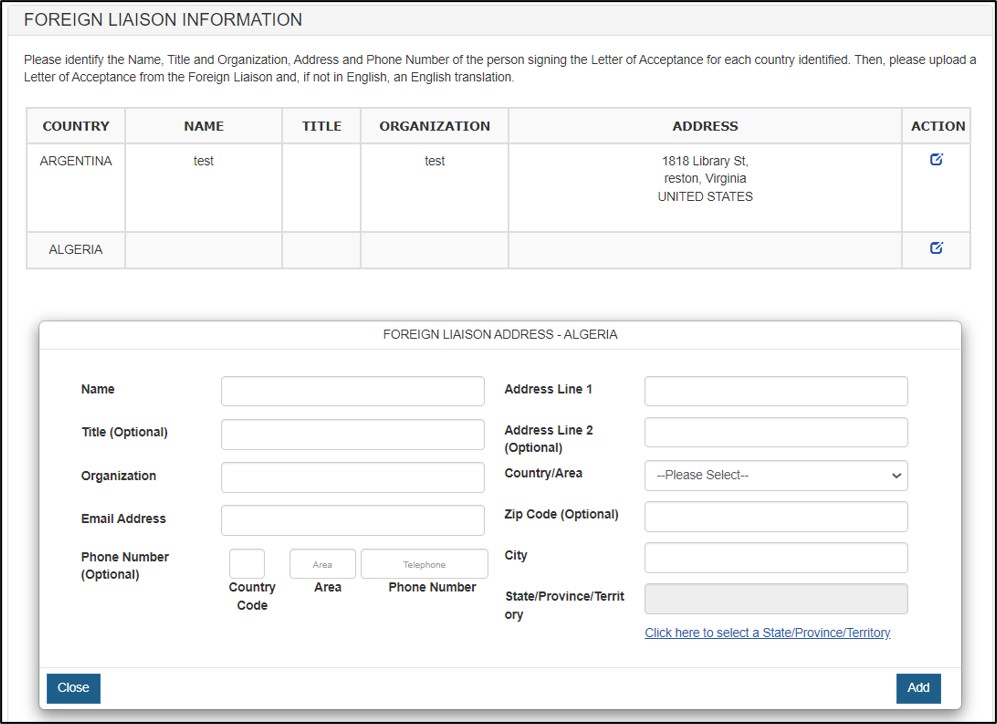
Identify the Name, Title, Email Address, Organization, Address(including zip code) and Phone Number of the person signing the Letter of Acceptance for each country identified. Click Add, you shall see the Foreign Liaison Information updated for the specific country. See Figure 16 below.
Figure 16: Foreign Liaison Information updated
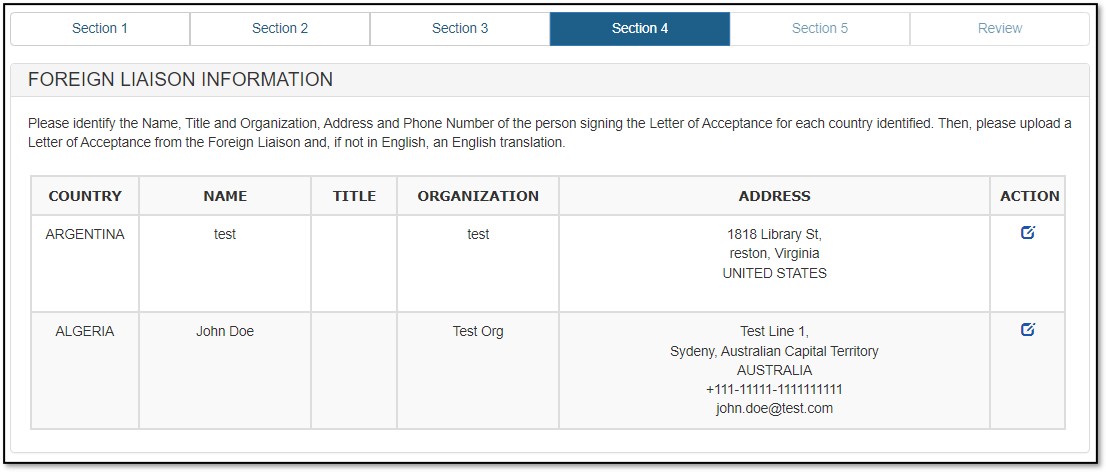
Foreign Liaison Information is required for all selected importing countries. Repeat the process for all importing countries you have selected in your EPL application. Click on "Next" to proceed.
Section 5 – Attachments
For an Export Permit Letter, you must provide the Export Permit Letter Request (Cover Letter) and the Letter of Acceptance for the specific country or the European Union, as shown in Figure 17 below.
Figure
17: Attachments
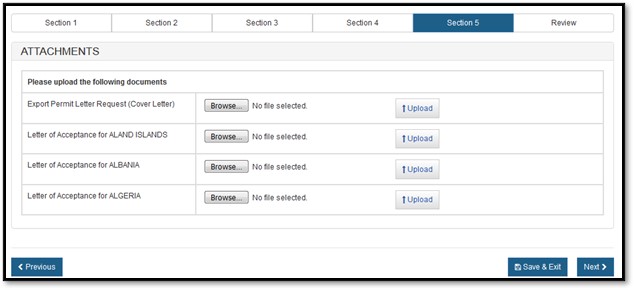
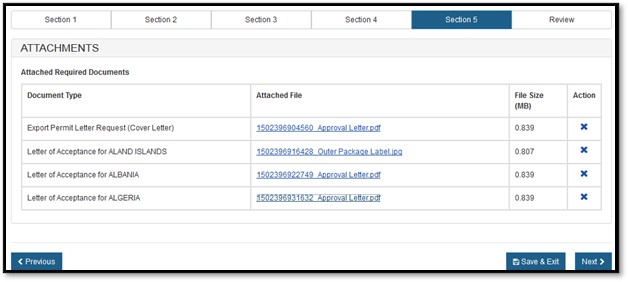
Select the "Browse" button and then select your file to be uploaded. Once you have selected your file, click on "Upload". If successful, the system will display your filename as a hyperlink, as shown in Figure 18 below.
Figure
18: Attachments successfully uploaded
Once you have attached the required documents, click on "Next" to proceed.
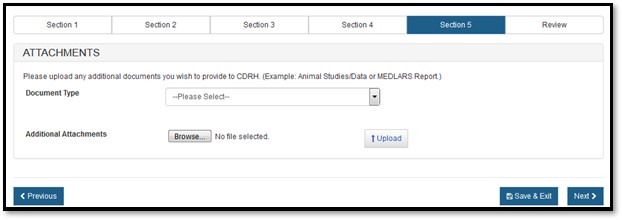
Section 5 continued - Additional Attachments
You have the option to attach additional documents to your application or you can continue to the next section by clicking on "Next".
If you decide to add additional documents, you are required to select the Document Type from the dropdown and upload the attachment, as shown in Figure 19 below.
Figure
19: Load attachments
Select the file, click on Browse, select the file to be uploaded and click on "Upload". The system will display the link, as shown in Figure 20 below. To remove the attachment, simply click on the "X" icon.
Figure 20: Attachments successfully uploaded

NOTE: If you select "Other" in the Document Type dropdown list, you must provide a description of the attachment.
Once this section is completed, click the "Next" button to proceed to the next page
Supporting Documentation
Use this section to upload any documents specifically requested by an FDA reviewer (e.g. MDSAP audit or FDA inspection record). See Figure 21 below.
NOTE: This section is not required. Only PDF files less than 50MB will be accepted.Figure 21: Supporting Documentation

Final Review Screen
The system will display the entire application broken out by section, as shown in Figure 22 below. You may choose to modify a section by selecting the "Edit" button next to the section to be updated. The system will re-display the data entry screen corresponding to the chosen section. You may then make changes as needed.
Figure
22: Final Review Page
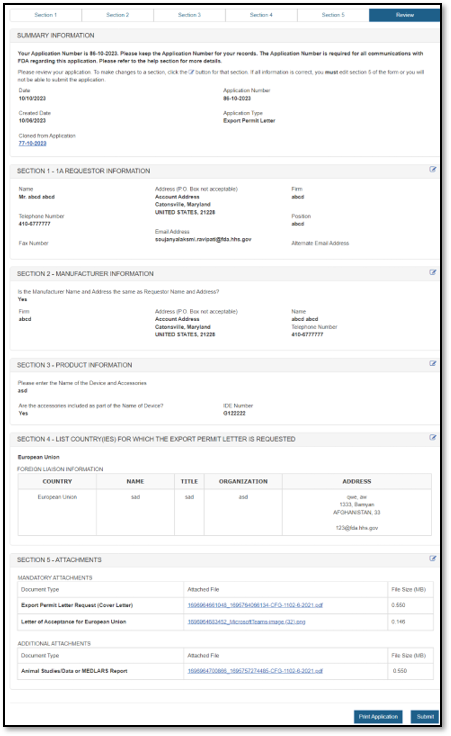
NOTE: The system displays one entry in each section. If multiple entries are entered in a section, (i.e., multiple attachments in Section 5), click on the down arrow to expand the list for that section.
You may choose to print your application prior to submission by selecting the "Print Application" button located at the bottom of the review page. However, the printed document will not have the application number assigned. The application number will be included if you click "Submit", "View Complete Application", and "Print Application".
NOTE: Printing the application will print the contents of the application itself and not a final Export Permit Letter. When finished, close the browser window in order to return to the CECATS application.
The system will display the application number and a message that the application was successfully submitted, as shown in Figure 23 below. NOTE: Please save this number for future reference. The application number will be required to check the status of the application. A confirmation email will be sent stating that the application has been successfully received; it will also include the application number.
Figure
23: Submission Success Page
